So I fixed up my corset this afternoon and it fits soooo much better now and that makes me incredibly happy with it. Just by replacing the broken and missing eyelets it got about ten times more comfortable and I was able to tighten it far more, which was a pleasant surprise. Below you can see a picture of the back with the new eyelets.
You can see that the shape is different from before, it actually creates noticeable curves now instead of just sort of, sitting there.
Sunday, 24 February 2013
Tuesday, 19 February 2013
Finished Corset Pictures
So I finished my patchwork corset! Well, I use the term 'finished' loosely. I'm far from happy with it, but let me show you some pictures before I state the corrections I want to make.
Overall I'm really pleased with it, it looks better than I thought it would and has given me lots of ideas for other things I'd like to make. In fact, it inspired an entire Steampunk ensemble and character (an airship pirate named Adrianna Ottilie Celendie Falenthorp or The Duchess, if anyone's curious...). But nevertheless it's too big, sloppily boned and in desperate, ardent need of some neatening up where the lacing bones are concerned. Thankfully this can all be fixed with some darts, a needle and thread and two more eyelets. In making this I really proved to myself that I need to stop being so generous with the seam allowance, in fact it might be better if I work off of the basis that less is better for a while. I'd love to hear some feedback on this so do drop me a line in the comments!
Next up t-shirt pictures!
Sunday, 17 February 2013
Full Equipment List (for arts challenge)
Whilst I'm waiting for an opportunity to get around to taking pictures of my finished tops and corset I thought I'd post a full equipment list since that seems to be a thing. Here goes...
Silk Panels:
Silk-like fabric
Fabric paints
Fabric paint lightener
Brushes
Water
Paper (to put on the floor so it didn't get paint-y)
Computer (for entertainment purposes only)
T-shirts:
Primark t-shirts
Screen (for screen printing)
Squeegee (for screen printing)
Stencils (for screen printing)
Paints (for screen printing)
Scanner (for scanning in the finished screen prints)
Image transfer paper
Printer (for printing the images onto transfer paper)
Iron
Patchwork Corset:
Old toile
Newspaper (for pattern pieces)
Pencil (for drawing pattern pieces)
Chalk (for drawing onto material)
Scissors
Fabric for lining, brown twill
Fabric for back, burgundy silk
Fabric scraps for front
Fabric paint (for printing with)
Cardboard (for collagraphs)
Glue (for collagraphs)
Scraps of paper, foil, cellophane, paper, card (for collagraphs)
Acrylic paint (to be mixed with textile medium)
Textile medium
Brushes
Boards and paper (to cover the table)
Iron (to fix the fabric paint)
Pins
Sewing machine
Needles
Thread
Steel busk bones with closing clasps
Steel lacing bones
Steel bones, both 13mm and 7mm wide
Black eyelets
Eyelet kit
Hammer
Tissue (for wiping blood from fingers).
Well, there ya go!
~*~
Plan/steps for corset-making:
1: create collagraphs
2: draft pattern
3: cut out lining and back sections
4: print on the fabric scraps (see post about that here)
5: iron to fix paints
6: pin scraps together and sew (sew lining and back pieces as well, see some of that here)
7: iron flat
8: cut front segments from sewn together scrap pieces
9: sew front sections together
10: sew all the gather elements of the corset together
11: start inserting boning using pins
12: sew boning in
13: insert busk bones and lacing bones
14: sew in
15: put eyelets in (in the lacing bones)
16: slit material over hooks and stitch around them
17: lace with ribbon and wear
Wednesday, 6 February 2013
Corset Progress: sewing
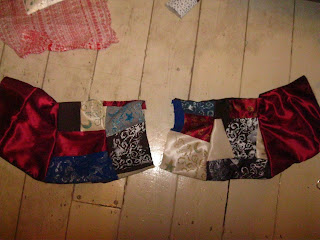
After I was done with the printing I ironed the pieces to fix the paint and then I began laying them out on the floor to get the arrangement right. It took a bit of fiddling around until I got them laid out in such a way that all pattern pieces fit.
Once I was completely happy with it I pinned it and stitched everything together. This was a finicky languorous process and not particular enjoyable either.
Then it was a case of cutting out all the pieces I needed and pairing them with the pieces for the back that I cut out ages ago.
I stitched everything together and then I could start laying out and pinning on the steel boning. I decided to sew it all in by hand because after using the machine on two strips of boning I had gone through five needles.
I've never made a corset with a busk bone that opens before, so it was a little bit of a learning curve. It's not something that I could do with the machine since I needed to navigate around the closures.
Once the boning was in I had to put in a couple of darts, and I still have to put in more since it's far bigger and looser than I'd like.
I had to get my dad's help to but the eyelets in since whenever I try I mash up all the bits that bend backwards over the material.
The last thing I needed to do was slit the fabric over the top of the catches that slip into the closures, I then roughly stitched around the edges to ensure that they wouldn't fray so easily.
I have a few minor adjustments to make and then I can take some pictures of the finished thing!
Sunday, 3 February 2013
Corset Progress: printing
I set up a sort of one woman production line downstairs in our dining room, I had the collagraphs I'd made a while back to hand and all the paints and fabrics that I wanted to use.
Mum found me an ancient jar of textile medium that you mix with acrylic paint to turn it into fabric paint and I also have lots of fabric paint left over from when I was painting the silk panels.
Though I only ended up mixing it with the white acrylic paint since I already had all the other colours I wanted to use. Due to the textile medium being practically prehistoric it created a really disgusting partially separated substance with the consistency of a tin of baked beans. Including the beans. It worked totally fine though so long as you didn't scoop up one of the lumps when you were applying it to the collagraphs.
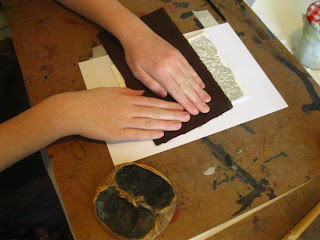
I applied paint to the areas of the collagraph that I wanted to print with then laid the material on top and pressed it down making sure to get all the bits where I remembered there to be paint. After using this method to print onto every piece of fabric and some not turning out so great I realised there was a better way of doing things. In retrospect I should have laid the material face up and pushed the card down onto it instead of the other way around.
I printed once more on that piece of fabric then moved onto some other colours. I continued in this way varying my fabrics and colours until I had what I deemed a large enough stack that when sewn together would create a big enough piece of material for me to get all the bits of corset I needed cut from it.
I can't resist uploading close up pictures of the collagraphs after I'd printed with them, there's something really beautiful about the faded metallic colours.
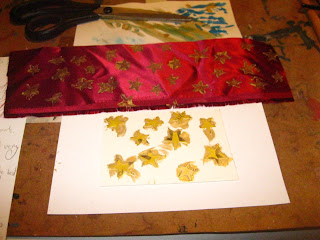
For printing on the gorgeous burgundy satin stuff I bought I wanted to create a new collagraph. There's a sack that my dad made for my mum when he was still in college, burgundy linen with golden stars printed on it and rough gold lining, I used to use it as a Christmas stocking before my sisters were born and I've always adored it. And I most certainly have never stopped loving the colour combination of burgundy and gold and stars as a pattern, so in tribute to that sack of my childhood I copied the design and used it in my corset. It's my favorite patch on the entire thing!
Though I only ended up mixing it with the white acrylic paint since I already had all the other colours I wanted to use. Due to the textile medium being practically prehistoric it created a really disgusting partially separated substance with the consistency of a tin of baked beans. Including the beans. It worked totally fine though so long as you didn't scoop up one of the lumps when you were applying it to the collagraphs.
I applied paint to the areas of the collagraph that I wanted to print with then laid the material on top and pressed it down making sure to get all the bits where I remembered there to be paint. After using this method to print onto every piece of fabric and some not turning out so great I realised there was a better way of doing things. In retrospect I should have laid the material face up and pushed the card down onto it instead of the other way around.
I printed once more on that piece of fabric then moved onto some other colours. I continued in this way varying my fabrics and colours until I had what I deemed a large enough stack that when sewn together would create a big enough piece of material for me to get all the bits of corset I needed cut from it.
 |
| Some surfaces held up better than others. The cellophane and foil did not. |
I can't resist uploading close up pictures of the collagraphs after I'd printed with them, there's something really beautiful about the faded metallic colours.
Saturday, 2 February 2013
Comments
I received a comment via email, and I wanted to share it but also notify everyone that if they can't post comments the normal way they can always email them to me at ChirucupcakeChan@gmail.com and I will copy and past them into this post.
~*~
Matilda
Phew Tils! Your introduction is so exciting, full of ideas and inspiration from here, there, and everywhere..You sound very much in charge, interweaving your course work and your passions outside college.Clever.
Jenny Lewis..
~*~
~*~
Matilda
Phew Tils! Your introduction is so exciting, full of ideas and inspiration from here, there, and everywhere..You sound very much in charge, interweaving your course work and your passions outside college.Clever.
Jenny Lewis..
~*~
Subscribe to:
Comments (Atom)


